
There are an increasing number of field recorders on the market. The Atomos Samurai, which can record from an HD-SDI output, started shipping a few months ago, but has been in such demand that it was only recently that we could get our hands on it for a comprehensive review.

IN THE BOX
I know we all expect everything to be plug and play when it arrives, but I recently did a review of the BlackMagic Shuttle and I had to footle around trying to find the correct connectors. In fact, I had to wait a week until I could get hold of the HD-SDI cables with the mini BNC connector as it wasn’t something I had in the office.... and I had to get hold of a dock to plug the drives into my Mac.
So, the first thing I like about Atomos is that the Samurai comes with almost everything you need. No need for rootling through cupboards looking for extra bits, you’ll be up and running in no time.
And as an aside, it is packed in a good sturdy case to keep everything protected on the road. There are even holes to pass a padlock though for extra security. These little details matter, whether you’re a hire company handing these things out or you are a freelancer who has saved up to buy your own.
 |
| Atomos Samurai tucked up safe in its case |
Pop open the case and everything is neatly laid out. All your kit sits in a dense foam that is pre-cut to stop everything rattling around. It also means you can see at a glance if anything is missing.
First you’ll notice the Samurai itself. Under that is one USB (2 and 3) cable. Plus, a little packet of eight screws. These are for securing the drives in the two caddies. There are slots pre-cut for four caddies should you want to add two extras.
 |
| Neat and tidy |
 |
| Samari with mains plug adapters |
 |
| BNC cables |
 |
| Two NP-F570 batteries and dual battery charger |
 |
| The dock with two caddies for holding your drives |
Tucked inside you should also find a manual, which is well written (which makes a change) and easy to follow. I always read the manual of any piece of kit I use. Unfortunately, my review kit didn’t come with a manual, but a quick trip to the Samurai website and it took a few seconds to download it for some bedtime reading. With firmware upgrades coming thick and fast you may want to download the latest version.
FIRMWARE
Once you get your Samurai I recommend you check which version it is. This is simple. Switch on the Samurai. Press the blue on-screen MENU button, then press the green Samurai INFO button. You should now see which version firmware you have. My review model was V2.61 – but while I had the Samurai an update was released. I decided to update the firmware to check out any new features.
If you intend to do a firmware upgrade, this is one time you really should read the instructions and follow them exactly as Atomos direct. It will only take a few minutes to install and update. I recommend you keep the firmware upgrade page bookmarked as Atomos have promised to keep the Ninja and Samurai up to date by issuing regular firmware upgrades.
Also, don’t forget to register your Samurai and you’ll receive two Mini SDI to BNC adaptor cables and a D-Tap dummy battery, which will enable you to power the Samurai from an external broadcast battery source.
[[Update: AtomOS 4.0 - including Avid DNxHD support - now available]]
FIRMWARE
Once you get your Samurai I recommend you check which version it is. This is simple. Switch on the Samurai. Press the blue on-screen MENU button, then press the green Samurai INFO button. You should now see which version firmware you have. My review model was V2.61 – but while I had the Samurai an update was released. I decided to update the firmware to check out any new features.
 |
| Firmware version 2.8 |
Also, don’t forget to register your Samurai and you’ll receive two Mini SDI to BNC adaptor cables and a D-Tap dummy battery, which will enable you to power the Samurai from an external broadcast battery source.
[[Update: AtomOS 4.0 - including Avid DNxHD support - now available]]
WHAT YOU’LL NEED
The most important thing you will also need to buy is the recording media. Atomos do not provide the media to record onto. You will have to buy your own HDD (hard disk drive) or SSD (solid state drive).
If you are on a sedate shoot – where the camera isn’t moving, then the spinning disk of a HDD should be OK - it isn't keen on being knocked around. A faster 7200 RPM drive is recommended by Atomos if you intend to record at the higher bitrates. But, if you can afford it, I would highly recommend you get a SSD as it will be more robust.
I also recommend you check the manual as Atomos has set out the pros and cons of HDD and SSD. They also explain the difference between megabytes (the drives data rate) and megabits (your camera’s date rate) – useful when you’re trying to calculate how much video you can record on your drives.
The big difference between the Ninja and the Samurai is the shift from HDMI to HD-SDI connection. This type of output uses BNC connectors that provide a more secure method of connection than HDMI, which is why you see them on so many professional bits of kit.
 |
| HD-SDI socket on the camera |
 |
| Mini HD-SDI socket on the Samurai |
You’ll probably need a BNC-to-BNC extension cable (male to male). The cable supplied is fairly short – about 24cm. Even if that is long enough you’ll still need a male-to-male BNC coupler. Because the supplied cable has a female BNC and the one on your camera will also be female, the two won't connect without a male coupler. Or a short male-to-male BNC cable.
 |
| Female socket - Female cable end |
ATTACHED
The Samurai does have two ¼-inch screw holes (top and bottom of the unit). But, you’ll need something to connect it to the camera. These little adapter do-hickeys are easy to get hold of. I’d recommend one with a ball head which allows you to tilt the Samurai into a good viewable position.
 |
| Ball and socket adapter |
I also like those small friction arms for maximum manoeuvrability.
 |
| Flexible arm |
The Pic Flex 7inch friction arm would do the trick nicely - it’s £19.95 ex VAT from PEC.
QUICK TOUR
Right Hand Side...
It is fairly minimal – there is the drive's release catch at the top, plus the power ON/OFF button. It is a simple press to switch on – but you’ll have to hold it in for 4 seconds to switch off. This is a deliberate attempt to stop you doing something bad by accident. You really have to want to switch it off.
 |
| ON/OFF and latch for the drive |
Left hand side…
On the other side you have the SDI input socket, which you should connect to your camera, and an output connector where you could attach a second monitor. There is also a LANC input and output for controlling the Samurai remotely. At the bottom there is a 3.5mm stereo line audio input and a 3.5mm stereo line output you can use for your headphone and monitoring the audio
Also on the left hand side you have the slot for the drive. The caddy holding the drive will stick out a little to give you something to grab onto when you need to remove it. You'll find it is a snug fit and does take a little effort to remove. But, that is a good thing; the last thing you want is for the drive to fall out by accident in the middle of a recording.
THE HOME SCREEN
On the other side you have the SDI input socket, which you should connect to your camera, and an output connector where you could attach a second monitor. There is also a LANC input and output for controlling the Samurai remotely. At the bottom there is a 3.5mm stereo line audio input and a 3.5mm stereo line output you can use for your headphone and monitoring the audio
 |
| SDI - LANC and Audio |
THE HOME SCREEN
The only way to describe the home screen is it is very Apple like. It is simple and intuitive. Those of you who don’t like reading the manual shouldn’t find it too tricky to find your way around. Dominating the screen are the four big round control buttons: Record, Play, Monitor and MENU.
 |
| Samurai Home screen |
Before you get too excited and start to record, you should have a look at the other things on the screen.
Top left will indicate format – if you are not plugged in you’ll see the message “No Input”.
Top left will indicate format – if you are not plugged in you’ll see the message “No Input”.
The Samurai will support a wide range of formats: -
- 1080i60
- 1080i59.94
- 1080i50
- 1080p30
- 1080p25
- 1080p24
- 1080p23.98
- 1080pSF23.98
- 1080pSF25
- 1080pSF24
- 1080pSF30
- 720p60
- 720p59.94
- 720p50
- SD - 480i, 486i and 576i
Centre and top of screen is the recording format. One of the big benefits is the real-time encoding of these outputs to an edit friendly format for Final Cut Pro users...
- ProRes HQ - 220Mbps
- ProRes 422 - 150Mbps
- ProRes LT - 100Mbps
and, coming soon, Avid DNxHD (paid option)
- HD - 220Mbps
- HD - 145 Mbps
If you are a registered user look out for that upgrade. For those of you doing greenscreen work or bruising the pixels in post, this is all in the 4:2:2 colour space at 8- or 10-bits.
For the up-to-date technical specifications check on the Samurai tech specs page.
In the top right of the home screen you’ll see an indication of battery life - press on the blue arrow to check exactly how much power is left in each battery.
 |
| Battery indicator page |
In the carry case you should have found the two NP-F570 batteries (and dual charger). The Samurai has two battery slots on the back. Expect to get around eight hours operation. Slightly more if you don’t have the screen on full brightness. As with the Ninja, you can swap a dead battery for a fully charged one, in the middle of a recording if necessary, without powering down. I’d always recommend you buy extra batteries for any bit of kit.
 |
| lower part of home screen |
Bottom right of the home screen you’ll see what sort of drive is being used and its size. If you just see --:--:-- then you don’t have a source plugged in. But plug in a camera and you’ll see how much recording time is left on the drive. By pressing the blue arrow - you'll be taken to the format screen.
 |
| Formatting the drive ready for recording |
At the bottom, centre of the home screen is the name of the unit: 'SAMURAI'. If you change it (you can see below I changed this one to URBNFOX), your shot list will reflect the change of name.
 |
| change the name (seven letters maximum) |
 |
| then all your shots can be identified as yours |
If you own more than one Samurai it might be handy to give them different names - so you can easily identify which shots came from which device.
Bottom left - is the audio input level meters and, if you touch the blue arrow, the audio controls.
Bottom left - is the audio input level meters and, if you touch the blue arrow, the audio controls.
 |
| 12 audio channels |
On the audio screen you will have control of 12 audio channels via HD-SDI. There are also two analogue audio channels if you plug into the stereo line-in socket.
Here you can decide which channels are output to the headphones and adjust the headphone volume. Please note, you’ll only be able to monitor channel one and two in playback mode.
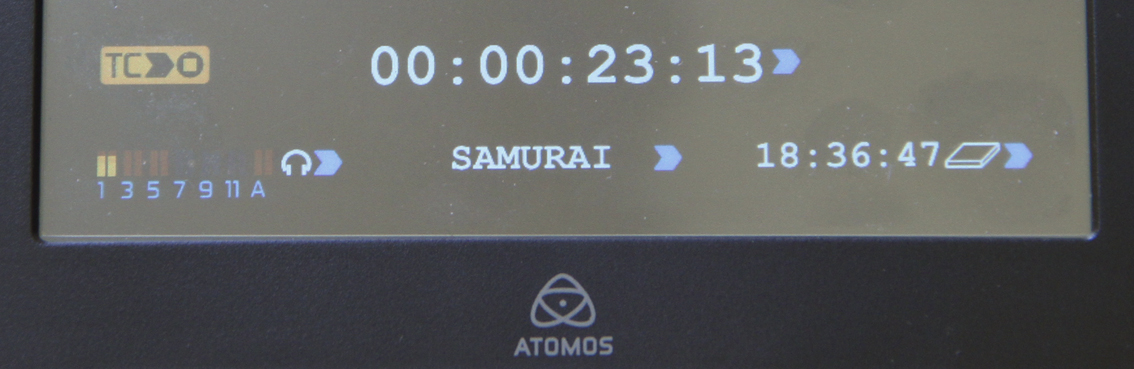
Along the lower third of the home screen are the Timecode and trigger options. You can have the usual flavours of time code: Record Run and Time of Day (free run). There is also Auto Restart – with this function you set your timecode so that EVERY shot you record starts with that timecode. This option doesn’t make sense to me. If I have two cameras I may want them to have synchronised time code. But, why on earth would I want all my shots (on one device) to have the same timecode? It is more useful for all your shots (from the same camera) to have different time codes. Puzzling.
Here you can decide which channels are output to the headphones and adjust the headphone volume. Please note, you’ll only be able to monitor channel one and two in playback mode.
Along the lower third of the home screen are the Timecode and trigger options. You can have the usual flavours of time code: Record Run and Time of Day (free run). There is also Auto Restart – with this function you set your timecode so that EVERY shot you record starts with that timecode. This option doesn’t make sense to me. If I have two cameras I may want them to have synchronised time code. But, why on earth would I want all my shots (on one device) to have the same timecode? It is more useful for all your shots (from the same camera) to have different time codes. Puzzling.
 |
| Timecode options |
Let's imagine you have a nervous disposition. You want to record on both the Samurai and the camera's media – that way if there is a problem you could sync shots as they would have the same time code. But, this means hitting record twice - once on the camera and once on the Samurai... doesn't it?
Well no. Atomos thought of that. So, if you set the camera trigger to your camera manufacturer (you can see mine was set to Canon. Set the timecode to HD-SDI and then (on the home screen) set the camera trigger record option to enabled, you can press record on the camera and the Samurai will drop into record too. Perfect.
OOPS...
 |
Home screen trigger enabled icons
|
OOPS...
Now, all these ‘buttons’ or options are available on a touch screen, but the last thing you want is to touch one by accident and change a setting. My GTC colleague Jonathan Young wrote about this when he reviewed the Samurai back in December 2011. One of his wishes was for a lockable screen. Jonathan works mainly on news and docs – and in the rough and tumble some options kept getting changed.
Most manufacturers say they listen to users, but not many of us actually believe it. However, Atomos' Jeromy Young replied to Jonathan’s post and we now have a way to lock the screen.
To lock (and unlock) the screen is now very simple - just quickly press the ON/OFF button.
 |
| No more accidents |
I’ve also met Jeromy Young at various exhibitions and he spends a lot of time talking about the Samurai and Ninja – but a lot of time listening too. He genuinely seems to want to keep improving these field recorders and has told us several times that they want to keep issuing firmware upgrades on a continuing and regular basis so that they can incorporate features and feedback from customers. It is good to see a company keen to listen and add features which genuinely help users - and many of the things we've been asking for are in the recently announced AtomOS 3.0, which will be a free upgrade.
MENU
MENU
Selecting the big MENU button on the home screen accesses a few more features you can tweak on the Samurai.
 |
| menu options |
Scene & Shot – is handy for anyone working in drama. Not surprisingly, it allows you to label each shot, scene by scene.
When you press PLAY on the home screen - you'll see a list of your shots. These are labelled as shot, scene and take.
 |
| name shots by scene and shot number |
 |
| Playlist |
If you don't shoot drama this is not a particularly useful feature. It would be more useful to have a "Documentary mode" too. That way shots would be simply labelled with an alphabetical prefix and shorter numerical suffix, e.g. AA0001.mov for the A roll camera or FOX0001.mov to identify the cameraman maybe.
Date and time. You change the date and time here. Definitely worth doing if you use time of day timecode.
Display allows you to adjust screen brightness, and gives you the option to turn the screen off when it is in locked mode. This probably saves some battery power, but it would a little scary to be recording and have no visial feedback that all is working. So, unless it's on a remote record, I think I’d leave the screen display on - even when locked.
Samurai info just shows you which version you are on – I upgraded to Version 2.8.
Time code: same as using the home screen shortcut to timecode – as already mentioned.
And Power Off – Hold for 4 seconds to turn off. Or use the big on/off button on the side.
Date and time. You change the date and time here. Definitely worth doing if you use time of day timecode.
Display allows you to adjust screen brightness, and gives you the option to turn the screen off when it is in locked mode. This probably saves some battery power, but it would a little scary to be recording and have no visial feedback that all is working. So, unless it's on a remote record, I think I’d leave the screen display on - even when locked.
 |
| Lower the screen brightness to save battery time |
Time code: same as using the home screen shortcut to timecode – as already mentioned.
And Power Off – Hold for 4 seconds to turn off. Or use the big on/off button on the side.
RECORDING
So you’ve set everything up – surely it must be time to record. The home screen has a nice big REC button. Once pressed it will drop into record immediately. The only way to tell you are recording on the home screen is because the REC button now says STOP - of course, if you were set to REC RUN timecode it would be running.
However, if you press MON (the monitor button) you’ll see your shot with a red bar top and bottom of the screen and a small REC in the top right (picture below). The monitor screen is OK for confidence checking but Atomos is adding Zebra stripes for exposure checking and Peaking for focus in AtomOS 3.0.
So you’ve set everything up – surely it must be time to record. The home screen has a nice big REC button. Once pressed it will drop into record immediately. The only way to tell you are recording on the home screen is because the REC button now says STOP - of course, if you were set to REC RUN timecode it would be running.
 |
| Stop recording screen |

Once you’ve finished recording you can also use the monitor to watch your shots. My only minor gripe is there is no on-screen shot number, which would be handy for logging shots (although that is also being addressed in AtomOS 3.0). But, there is timecode.
In conclusion
If you have a camera that does not record at a high enough bit rate for broadcast, such as the Sony EX1 and EX3, then you should seriously consider the Samurai. It is certainly cheaper than buying a new camera. If you have a DSLR the Ninja is a better option with its HDMI connections. Atomos does have a range of Connect adaptors that allow either recorder to be used with the other input (and will also add XLR audio inputs that way).
Practically all professional video cameras have a secure BNC connector for HD-SDI output. And most medium budget pro cameras can record at least 50Mbps. But for higher quality images and for more intensive post-production work, the Samurai will give you access to those higher bit rates (100-220Mbps). It is also useful as a back-up recorder.
If you are editing in Final Cut Pro (or Premiere if you have it set up to work with ProRes) or Avid with DNxHD, then recording on the Samurai means you won't need to spend time transcoding any of your shots, so you can start editing more quickly, and simplify your workflow.
A few weeks ago I was training with a different field recorder (on an EX3). It was, to say the least, a bit of a nightmare. It looked old fashioned, its menu options were long (several pages) and a bit bewildering for the beginners in the group. If only they had bought a Samurai, we could have spent more time shooting and less time worrying about I-frames and Long GoP.
With the Samurai it is all very simply laid out and intuitive. Atomos hasn't gone overboard on the menus and those it does have are easy to understand. That said, more features are coming and free upgrades are regular - so I'm sure we'll look at these new features as they come out.
In summary: it works well, the results look good, and it is reasonably priced at $1595, €1145 or £995 (plus taxes). If you want to pay less, its main competitors are the Ninja 2 and the Blackmagic Design Hyperdeck Shuttle (which records uncompressed and DNxHD - with ProRes likely in future - but doesn't have a built-in monitor and is SSD only).
I like that Atomos do listen to their customers. If you have feedback - talk to them. They seem to be nice guys who make a great product that will keep on getting better. What more could you ask?
[[UPDATE: Atomos has introduced new Samurai Blade with a sharper monitor and upgraded operating system (AtomOS5) – it has also cut the price of both the Samurai and Ninja-2]]
If you are editing in Final Cut Pro (or Premiere if you have it set up to work with ProRes) or Avid with DNxHD, then recording on the Samurai means you won't need to spend time transcoding any of your shots, so you can start editing more quickly, and simplify your workflow.
A few weeks ago I was training with a different field recorder (on an EX3). It was, to say the least, a bit of a nightmare. It looked old fashioned, its menu options were long (several pages) and a bit bewildering for the beginners in the group. If only they had bought a Samurai, we could have spent more time shooting and less time worrying about I-frames and Long GoP.
With the Samurai it is all very simply laid out and intuitive. Atomos hasn't gone overboard on the menus and those it does have are easy to understand. That said, more features are coming and free upgrades are regular - so I'm sure we'll look at these new features as they come out.
In summary: it works well, the results look good, and it is reasonably priced at $1595, €1145 or £995 (plus taxes). If you want to pay less, its main competitors are the Ninja 2 and the Blackmagic Design Hyperdeck Shuttle (which records uncompressed and DNxHD - with ProRes likely in future - but doesn't have a built-in monitor and is SSD only).
 |
| I'm sure |
[[UPDATE: Atomos has introduced new Samurai Blade with a sharper monitor and upgraded operating system (AtomOS5) – it has also cut the price of both the Samurai and Ninja-2]]
Christina Fox


No comments:
Post a Comment